Showing posts with label chit-chat. Show all posts

Thursday, March 30, 2017

A Problem And A Plan

I have been really struggling with the weight of my clothes. I generally wear a chemise and drawers, a corset, a cage, two starched petticoats and a dress. All of this really bogs me down. Individually, each piece is very comfortable but that is not appropriate for going out to an event.

In looking at fabric I came across some lovely white cotton lawn for a very reasonable price. It was on sale for less than $4 a yard. Unfortunately I missed the sale by a day but I made the purchase anyway. I had my mind made up.

My plan is to make a nice, light chemise, a pair of drawers, and at least one petticoat from this lawn. I would love to use it to remake my blue sheer but I will probably need to order more for that. 

I started a challenge for myself a few years ago and I think that I will pick it up again now. It was to make an undergarment item each month for a year. How nice it will be to have 3, new, full sets!!! 


Tuesday, March 10, 2015

New Fabric On The Way

My husband had so much fun at the Winter Ball in Gettysburg that he is finally open to the idea of dressing up and accompanying us to events.... such as other balls and perhaps a baseball game this summer. He currently has nothing in the way of historical clothing. So, of course it was time to go shopping. I happened to see some great fabrics at fashionfabricsclub.com and made my order.


I am a little hesitant because the last order I placed with them took over two weeks to get to me. I'm hoping that I get my fabric sooner than that. Most of the fabric I purchased with him in mind, other items in the order were just too good to pass up.


Tan & Brown Plaid Medium Weight Linen

I love plaid. This can be a sack coat or pair of pants. If my husband doesn't like it, I do have two boys that could benefit from new suits.


Solid Cocoa Brown Lightweight Linen

Here is an example of a deal too good to pass up. I had originally picked this for part of my husband's summer picnic suit but now I am thinking that it will be too thin. I may be able to use it with a lining but if it's unusable for him, we will just call it brown Holland and make boy's aprons.


Dusty Plum & Ivory Plaid Light Weight Linen


I did mention that I like plaids, right? This cute plaid is for the vest or waistcoat front. It will be lined with white cotton twill, the same will be used for the vest back. I really can't see using all of this for just one vest so I am hoping that I can get a mini vest too, for one of my boys.


This is another piece that I have high hopes for but I'm not really sure about the weave. I am wanting to make pants from this but I love browns and this would go beautifully in my modern sewing. If my husband bales on the idea of dressing up before the piece gets cut.... it's all mine.


Antique Gold Plaid Wool Suiting

I love the colors in this piece. It has antique gold, blue, green, burgundy and white in it, according to the description. I'll have to inspect it more closely once it have it in hand, just to make sure. This is a light to medium wool and I'm hoping that it will make a nice vest front. The back will be brown polished cotton. There was only one yard of this available. I would have loved to get a long length for a bigger project. Again, if the weight or weave isn't correct, this will be joining my modern fabric projects list.


Natural Canvas 10 oz
This is just a fun piece. I've been wanting to try my hand at making a painted floor cloth and now I can. I am also playing with the idea of making my own tent for our trip to the National 19th Century Base Ball Festival in July. I'll want to see how well I can sew the hem on my machine before I take on the task of sewing an entire tent. I'll probably play with grommets as well.

Here are some inspirational images to keep me going:

https://www.pinterest.com/pin/354165958172206791/

https://www.pinterest.com/pin/354165958172206816/

https://www.pinterest.com/pin/354165958172206767/


https://www.pinterest.com/pin/354165958172174252/

Monday, February 9, 2015

Turquoise Voile Girl's Dress

3/3/2015 Update - Here is how the dress looked for our children's ball last Saturday:


It's not completely finished. I need to add the box plaiting at the hemline as well as adding a silk sash at the waist. Also, the child wants puffed sleeves instead of open sleeves and there was no time to finish that detail before the party. As a side note, it seems that this child also needs a new cage. Her current one doesn't seem to give the proper shape to this dress..... Alas, how my sewing list grows!!

2/9/2015 Update - Well, It's been three years since I purchased this fabric and many dresses (both modern and historical) have been made in that time. I do think that it's about time to finish... or should I say start, this project. It just so happens that the Dreamstress is hosting a Blue Challenge for her February Sew Monthly. Hopefully this will be enough of an encouragement to finish. If I am able to finish this dress, my dear daughter will be able to wear it as a party dress to our private Ball at the end of the month. Wish me luck! 

6/2/2013 Update - Here is the inspiration image for this dress. Unfortunately we only get a back view to admire.
Journal De Demoiselles March 1862

Of course I am talking about the little girl. Here is a closer look:
  

 I will not be doing the fluting at the bottom of the dress because I don't think that the fabric will hold the pleats. I will also need to get some silk for the belt and rosette.

Original Post 11/13/2012 - Fabric Mart just had a $1 sale on turquoise cotton voile.

I was able to pick up 5 yards and am planning on making a sheer dress for my young daughter. I can see a lined body with gathered, puffed, short sleeves, and perhaps some tucks in the skirt. Wouldn't a matching, sheer bonnet be nice as well?

I received the voile today. It is not as sheer as I has expected, but it feels very durable and has a nice shine. I look forward to making a nice dress from it next spring.

Wednesday, February 4, 2015

Making A Ball Gown ~ Finished

Ball Gown Update 2/4/15 ~ My dearest husband decided to surprise me with tickets to the Winter Ball in Gettysburg last Saturday. I was fortunate to have been told and was able to start at the beginning of January. As you can imaging, I worked daily to get my gown finished before the event. This lovely surprise moved my due date for this project up an entire month. Here's what I completed:


The first thing that I had to do was to remake my cage.... again. Our trip to Cedar Creek really destroyed it. I also added an attached bum roll to help with a back thrust for my skirts. I really like how it turned out but looking at the pictures, I think that I could go wider with my cage.

I do confess that most of the work went into the flounced petticoat or under skirt. There are 11 flounces and each one took an entire day. They are all hand hemmed and hand gathered. However, I did use the machine to attach the flounces to the base skirt. My favorite part about this petticoat is that I can use it under the wrapper that I have planned as well as for the skirt of my new sheer.

The silk for the bodice and over skirt came from FashionFabricsClub.com. It's called "Bronze Brown Silk Taffeta" and has an embroidered check design. I do confess that when I first opened the package I almost cried.... it looked like curtains. It had taken so long to arrive and I didn't have any time to send it back and order something else. I shoved it back into the bag and tried to forget about it for a few days. Finally, I pulled it back out and draped it on my mannequin. After a few days of looking at it draped like that, it slowly started to look like dress fabric.

The bodice and over skirt were finished in about a week. I used Past Patterns 704 for this and really like how the double puff sleeve turned out. I used a straight size 18, only taking in the side seams about 1/4 inch on each side. I also put in a gathering stitch to narrow the sleeve openings but other than that I made no alterations. It would have been nice if there was an actual bertha pattern included.

The bows were made from black silk satin organza. I wanted to use wide silk ribbon but everything that I saw was very limp and wouldn't have given the look that I was going for. The fabric was ripped into strips and hemmed on both sides. Then the bow was made and two were attached to the over skirt and one went into my hair.

I am already planning my improvements for this gown. I'm going to add a sheer bertha decorated with strips of the bodice fabric (if I have enough) and take a little bit off on the side seams of the bodice. I had wanted to also make a new under skirt of silk but after the gown was stepped on so many times and drug on the dirty ground, I may just stay with a washable (and bleach-able) fabric.

~ ~ ~ ~ ~ ~ ~ ~ ~ ~ ~

12/09/2014 - Wouldn't you know that as soon as I start on a major project, like making a quilt, along comes another major project, like making a ball gown. We are hosting a party that includes a dance master, gowns and a lovely historic venue. So, of course I have to have a ball gown. After all, you can't hostess a ball without one, right?

Here are some ideas that appeal to me:

I'm going for a two part dress such as the red one above. I really like the open bodice style.


The ruffled underskirt is very nice on this one. For mine, I'm thinking a white underskirt and a colored over skirt.


I especially like this red one. 


I love this painting of Lady Elizabeth Gilstrap (1822-1891) by Richard Buckner (Newark Town Council, Newark, Nottinghamshire UK) . You can see her flounced, sheer under skirt. 

Currently, I have no silk. So, a sheer flounced underskirt would be a great place to start. I have until the end of February to finish my dress. Wish me luck!

Other Inspirational Gowns:

Here is a lovely example of a sheer flounced ball gown from the MET Museum


Godey's Lady's Book, December 1859
I adore the blue one on the far left. Is that 13 rows of flouncing that I see? Here's the description: Fig. 1. we have one of those characteristic tunic dresses, introduced of late, and notable for their novelty at least. Underskirt or petticoat of white silk, covered by innumerable small flounces. Tunic and corsage of blue satin; sleeves of white silk, with a ruche of blue; berthé trimmed with point lace.
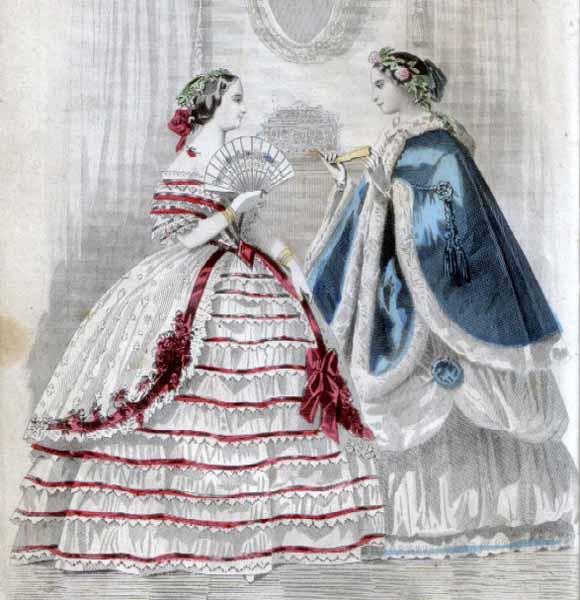

Peterson's Magazine 1860
I had been wondering if ribbon trimmed flounces would be an option... and it looks like they are. Fig. I. -Evening-dress of White Tulle, trimmed with eleven narrow tulle flounces, edged with blonde and narrow currant-colored velvet. A tunic of spotted tulle is trimmed with a broader velvet, a long wreath of velvet flowers, and a large bow of velvet ribbon. The sleeves and the berthe, which is of a heart shape, are trimmed to correspond with the skirt. Wreath of green leaves and velvet flowers. 


I really like this yellow one as well. I could use some gold silk that I have for the bodice and bows and order something that coordinates for the over skirt.

Monday, January 5, 2015

Lovely Ideas For January

I have so many projects in the works now but I really enjoy looking through the old magazines. Today's favorite was January's subscription to Arthur's Illustrated Home Magazine 1859. There are so many wonderful items in there to take note of. Here are my favorites:

I'm in love with this woodcut that opens the number. It is titled "These Are My Jewels". I can relate to this image of a mother in the presence of her darling children. They are her most precious possessions.

Since quilting has become my new long term project, this quilting pattern was very interesting as well. I really love the heart shapes. They really don't stand out as hearts so I think they will go well, or a version of this, on my Baby Blocks Quilt.

Being a lace maker, I was immediately drawn to this crochet imitation Honiton cuff and collar pattern. I wasn't able to find the instruction for this so I will need to go back and scour the issue again later. Most likely it will read that it can be made up easily from the illustration given.

And then there comes a cute story for parents about allowing their toddlers to learn to climb the stairs. I've read it before but skipped reading it today. However, it did bring a ready smile at the recollection.


Now that is something that I didn't remember from this issue. The Self Supporting Tournure. The main difference between this and our more recent cage supports is that the steels are represented by the vertical stripes and the horizontal are tapes. This is very interesting.


A tatted trim on chemise, petticoat, and children's clothing always looks lovely. The pearl is call a picot in recent times and this arrangement is very nice. Perhaps when I am bored of stitching my quilt pieces, I could work on some tatting. After all my shuttle is kept in my sewing box and is very convenient to take when visiting.

Speaking of my sewing box. This little needle book would look lovely in there. It makes my current needle book pale in comparison.


And of course there were other little project and nice stories to read but these were the ones that I wanted to note here, sort of as a reminder to myself. Perhaps I should start a notebook or two. One for quilting patterns and one for tatting patterns that can be kept in my sewing box for reference.


I have a bit of velvet, some bugle beads, cardboard, and ribbon. Perhaps I can take some time and put together that needle book some evening this month. We will have to see.

Monday, November 24, 2014

The Story Of A Baby Blocks Quilt

First Update - 12/9/2014
So far I have only been able to log 6 hours on this quilt. It seems that starting a big project just before the holidays makes for a very slow start. I also didn't realize how long it would take to cut all of those diamonds out of newspaper and scrap fabric and then baste the two. I'm actually having a lot of fun with this project, I'm just glad that I hadn't expected to complete it until next April.


~ ~ ~ ~ ~ ~ ~ ~ ~ ~

Original Post - 11/24/2014
I am finally starting on an endeavor in quilting. I have fallen in love with a pattern and have been lent the instruction on creating it. I have some documented, period correct fabric with which to start. So, the next logical thing to do is get started.

This quilt will be a small child's quilt and done completely by hand. Here is an example of what I am going for:


The National Museum of American History also calls this pattern "Cubework" and "Boxes" and this particular quilt is made from 4" cotton diamonds. The overall measurements are 47 in. by 41 in.

I am very excited to get started on this project. I will be using the paper piecing method to construct this. It starts with creating a template and cutting out a lot of paper diamonds. Then the fun really gets going when I scour my stash scraps for pieces big enough and varied enough for this project. I'll just keep adding to this post for updates. So stay tuned.

Here's more quilting inspiration:
Follow Wrapped In Scarlet 's board Quilts on Pinterest.

Tuesday, June 17, 2014

Improvements To My Sheer Unveiled

As much as I would have loved to make an entirely new sheer.... I really just needed to fix the one that I had.... and so I did.... I hope. I'll start with the reveal. Here is my improved sheer for summer:


Now for the explanation: Here is the original research for this dress and to follow is the dress as it looked in 2012:

http://jessicadeandesign.blogspot.com/2012/08/flounced-sheer-dress.html

* The first thing that stood out to me about the dress is that the cage was not large enough. This style dress is not intended to be worn over a work hoop of 80". A new cage style made an immediate improvement. (Read about that adventure here)

* Upon taking the dress apart, I decided to work on the sleeves. I started by hemming the under sleeves. It wasn't a huge improvement but I felt really good about it. (here's a picture of just the under-sleeves) Next I moved onto those droopy puffs. They really drove me crazy so I divided each one into two. They stand up much better now. The sleeves also got a trim. I wanted those pretty under-sleeves to show more so the over sleeve was shortened by an inch or so.


* The next item of interest is that I never trimmed the dress. It is in need of 1100+ inches of black blonde. Well, there is no way that I could find that quantity of black silk lace so I am debating other options. I was strongly leaning toward embroidered net instead... and doing the embroidery myself. This is not a difficult task just a very time consuming one..... but much less time consuming than producing the lace from scratch. Now, I've been inspired to add silk ribbon to the bottom of my frills. I'm thinking a bias plaid would look really nice. Now to find the bias plaid silk ribbon... This of course is still not finished.

* On we go to the next improvement, which was able to be made at once. I made a new separate/detached bodice lining from scratch. I love it. Here is where it stood originally:

Here is my improvement:

My new lining also has darts. The old one was attached to the sheer and made it very bulky.

*Lastly, I got rid of that white collar and remade the bodice. Thankfully I had loads of that sheer fabric left and was able to re-cut an entirely new top. The first thing that I did was to add an extra two inches to the length. I was really stuck on what style to make. For a while I was set on a pin-tucked cross-over bodice (like this) and then I thought an infant style boat-neck (like this) with a white fichu would be better. In the end I went back to my original inspiration fashion plate (here) and a great picture of Emily Todd (here). A simple V-neck was all I did. After all, there is just so much going on with the flounces and puffed sleeves that the dress really didn't need anything fancy for the bodice.


For accessories I picked up a summer hat and borrowed the blue silk sash from my daughter's fancy dress. She never wears it anyway. I also pulled a brooch from my grandmother's jewel box. I think it gives a nice contrast.

I'm also still playing with the idea of a white ruffle fichu. White next to the skin is highly recommended in the 1860s. I especially like how the white over a blue flounced dress looks in this fashion plate.

Over all I think the improvements are taking me in a very good direction. I'm very pleased with it.

Want to know what else I'm dreaming about? Check out my inspiration/research board on Pinterest:

Tuesday, June 10, 2014

Sparsely Adorned Sun Hats

Sparsely adorned sun hats have been on my mind lately due to the fact that I just purchased a hat and have no time to embellish it. Luckily it came with a cute ribbon. Here are some examples from the period:
Preparing For A Walk, Samuel Baldwin
Lizzie Clapp, North Bridgewater Mass.

Saturday, June 7, 2014

Fishing Creels For The Boys

I saw the cutest little baskets, weeks ago, and knew I wanted them for the boys. They were a bit high in price and I wanted to do some research before I purchased them so we just got them recently. They are the cutest little oblong, lidded baskets with leather straps. They make perfect junior sized creels, except for the missing hole in the lid.


We picked up one for each of the boys. I'd love it if no fish ever was put in these but I'm not holding my breath on that one, these are boys after all. My intention for getting them was for packing lunches and toys for day trips to local events.

My biggest issue was in finding period examples in painting, woodcuts, fashion plates, stories, etc. I found plenty on fishing for grown men but very little for boys. As it turns out, fishing creels have not changed much in the last several hundred years. So the shape is correct.... I'm just stuck on how common they were in miniature size.

Thursday, June 5, 2014

Hemmed Undersleeves

I'm in the process of re-making my navy sheer dress. I was under a deadline when I first put this dress together and never went back to finish the details. Well, here is one of those details. I finally hemmed my undersleeves and I think they look great.


Yes, the small things make me happy.

Thursday, May 29, 2014

Re-made Skirt Support

I'm working to remake my wardrobe as well as my impression and one of the first considerations in this endeavor is to remake my underpinnings. I have been converting my work corset into a fashion corset but I haven't gotten all of the kinks worked out of that. However, I have come to like the shape of my refreshed cage.


My original intention was to add a larger bottom rung, increasing it from 90" to 100+. However, as I was reattaching the hoops (after having taken them all off, reshaping them, adding more vertical tapes, etc.) I found that raising the top one, along with all the rest, gave a nice shelf to my bell shape. This in turn gives the appearance or illusion of a much fuller skirt support without actually increasing the bottom hoop. As it turns out, I like it enough to try it like this for a while.

Hopefully I will be able to finish my sheer dress remake within the next week and enjoy my "new" shape at an event.... as things currently stand, I have no dress that fits and flatters.... but I'm working on that.

In case you are wondering what silhouette I'm going for, here is an image to help. Do keep in mind that I'm not trying for anything nearly that big.

Tuesday, May 27, 2014

Patchwork Pattern

 Here is a new patchwork (quilt) pattern found in The Lady's Friend 1864. This pattern calls for silk but there are several similar museum quilts made of cotton. I'd love to find one made of wool.

While my favorite patchwork pattern is the Baby Blocks design, this one is becoming a fast favorite as well.

~ ~ ~ ~ ~

This quilting pattern was found in Arthur's Illustrated Home Magazine 1859