Showing posts with label trim. Show all posts

Monday, January 5, 2015

Lovely Ideas For January

I have so many projects in the works now but I really enjoy looking through the old magazines. Today's favorite was January's subscription to Arthur's Illustrated Home Magazine 1859. There are so many wonderful items in there to take note of. Here are my favorites:

I'm in love with this woodcut that opens the number. It is titled "These Are My Jewels". I can relate to this image of a mother in the presence of her darling children. They are her most precious possessions.

Since quilting has become my new long term project, this quilting pattern was very interesting as well. I really love the heart shapes. They really don't stand out as hearts so I think they will go well, or a version of this, on my Baby Blocks Quilt.

Being a lace maker, I was immediately drawn to this crochet imitation Honiton cuff and collar pattern. I wasn't able to find the instruction for this so I will need to go back and scour the issue again later. Most likely it will read that it can be made up easily from the illustration given.

And then there comes a cute story for parents about allowing their toddlers to learn to climb the stairs. I've read it before but skipped reading it today. However, it did bring a ready smile at the recollection.


Now that is something that I didn't remember from this issue. The Self Supporting Tournure. The main difference between this and our more recent cage supports is that the steels are represented by the vertical stripes and the horizontal are tapes. This is very interesting.


A tatted trim on chemise, petticoat, and children's clothing always looks lovely. The pearl is call a picot in recent times and this arrangement is very nice. Perhaps when I am bored of stitching my quilt pieces, I could work on some tatting. After all my shuttle is kept in my sewing box and is very convenient to take when visiting.

Speaking of my sewing box. This little needle book would look lovely in there. It makes my current needle book pale in comparison.


And of course there were other little project and nice stories to read but these were the ones that I wanted to note here, sort of as a reminder to myself. Perhaps I should start a notebook or two. One for quilting patterns and one for tatting patterns that can be kept in my sewing box for reference.


I have a bit of velvet, some bugle beads, cardboard, and ribbon. Perhaps I can take some time and put together that needle book some evening this month. We will have to see.

Tuesday, June 17, 2014

Improvements To My Sheer Unveiled

As much as I would have loved to make an entirely new sheer.... I really just needed to fix the one that I had.... and so I did.... I hope. I'll start with the reveal. Here is my improved sheer for summer:


Now for the explanation: Here is the original research for this dress and to follow is the dress as it looked in 2012:

http://jessicadeandesign.blogspot.com/2012/08/flounced-sheer-dress.html

* The first thing that stood out to me about the dress is that the cage was not large enough. This style dress is not intended to be worn over a work hoop of 80". A new cage style made an immediate improvement. (Read about that adventure here)

* Upon taking the dress apart, I decided to work on the sleeves. I started by hemming the under sleeves. It wasn't a huge improvement but I felt really good about it. (here's a picture of just the under-sleeves) Next I moved onto those droopy puffs. They really drove me crazy so I divided each one into two. They stand up much better now. The sleeves also got a trim. I wanted those pretty under-sleeves to show more so the over sleeve was shortened by an inch or so.


* The next item of interest is that I never trimmed the dress. It is in need of 1100+ inches of black blonde. Well, there is no way that I could find that quantity of black silk lace so I am debating other options. I was strongly leaning toward embroidered net instead... and doing the embroidery myself. This is not a difficult task just a very time consuming one..... but much less time consuming than producing the lace from scratch. Now, I've been inspired to add silk ribbon to the bottom of my frills. I'm thinking a bias plaid would look really nice. Now to find the bias plaid silk ribbon... This of course is still not finished.

* On we go to the next improvement, which was able to be made at once. I made a new separate/detached bodice lining from scratch. I love it. Here is where it stood originally:

Here is my improvement:

My new lining also has darts. The old one was attached to the sheer and made it very bulky.

*Lastly, I got rid of that white collar and remade the bodice. Thankfully I had loads of that sheer fabric left and was able to re-cut an entirely new top. The first thing that I did was to add an extra two inches to the length. I was really stuck on what style to make. For a while I was set on a pin-tucked cross-over bodice (like this) and then I thought an infant style boat-neck (like this) with a white fichu would be better. In the end I went back to my original inspiration fashion plate (here) and a great picture of Emily Todd (here). A simple V-neck was all I did. After all, there is just so much going on with the flounces and puffed sleeves that the dress really didn't need anything fancy for the bodice.


For accessories I picked up a summer hat and borrowed the blue silk sash from my daughter's fancy dress. She never wears it anyway. I also pulled a brooch from my grandmother's jewel box. I think it gives a nice contrast.

I'm also still playing with the idea of a white ruffle fichu. White next to the skin is highly recommended in the 1860s. I especially like how the white over a blue flounced dress looks in this fashion plate.

Over all I think the improvements are taking me in a very good direction. I'm very pleased with it.

Want to know what else I'm dreaming about? Check out my inspiration/research board on Pinterest:

Thursday, August 1, 2013

Traveling Bag

I added a traveling bag to my to-do list a few weeks ago. This particular bag goes over the arm and is embroidered. I have no time to embroider such a large design and have been looking for an applique instead. Here is one that I found in Arthur's Home Magazine 1858. Notice that the description says that it is suitable for a bag.

Thursday, July 25, 2013

Beadwork Adornments

There are occasionally illustrations given for beadwork. I especially like this one:

Sprigs of Flowers for Bead-work, Godey's 1858

Here is an article on beads from the same book:


Thursday, July 11, 2013

AGRAFE AU CROCHET.

AGRAFE AU CROCHET.
 
- ‘1 jeté , - diminution. - Recommencez quatre fois depuis " ; - une a l'endroit, -1 jeté, - diminution , - 5 à l'endroit, - 1 jeté, - diminution, - une à l'endroit, 1 jeté, - diminution , -une à l'endroit.
27° tour. -Une levée, - 2 à l'endroit; - * 1 jeté, - diminution. -- Recommencez quatre fois depuis ‘; - une a l'endroit, -- 1 jeté, - une a l'endroit, - 1 jeté , - diminution,- 2 a l'endroit, -diminution , -_ 1 jeté, - diminution , - une a‘l'endroit , - 1 jeté, -- 3 à l'endroit.
On répète ces tours depuis le 5° tour. jusqu'à ce que l'on ait la longueur voulue, puis on encadre les pleins, en passant autour, en reprises, du fil plat, ainsi que l'indique le dessin.
 
I have no idea what the above says. It's all that I could come up with from La Mode Illustree. Thankfully a dear friend from TheSewingAcademy.org was able to translate the pattern from the German version found in Der Bazar, January 1863. Here is what she came up with:
 
Crocheted Agrafe
see figure 51.
Materials: very strong (or heavy) black Cordonnet(?) silk, coated (or annealed?) thin florists wire, some open(?) silk, twisted silk cord, a Bikeschen(?) or olive(?) button.
 
The full-size figure of the agrafe shows clearly that both of the main portions are formed by a twig with a 5 petaled flower and the accompanying leaves. The size and shape of each individual crochet piece, as well as the assembly of the pieces, can also be gleaned from the figure.
All flower and leaf pieces are made with very strong (see above) black Cordonnet(see above) Silk and are made from the middle out, spiraled like a snail, in the round, using firm(or tight) chain stitches (Don't know if this means a particular stitch). For the oval pieces, a center vein is made by hooking 5-7 stitches, and, depending on the required size of the piece being made, 2, 4, or 6 rows are crocheted around this beginning.
 
On every row, add a few stitches on both ends of the vein, so that an oval surface forms.
 
For the round pieces, cast on (hook) 3-4 stitches, close them into rings, and crochet around them in a snail-like spiral while continually adding stitches, until a round flat surface of the required size is formed.
 
To create a toothed leaf, make a starting chain like for the oval leaves, and then crochet around it. Work until about the middle of one of the long sides, thereupon 3 L.(?), turn the piece and crochet back over the first two of the 3 L.(?) and the most recently worked stitches, until the beginning of the row; from here make a back and forth row on the other side in the same way.
 
All of the individual crocheted pieces form the top, right side, using the wrong sides of the individual pieces. Organize and assemble the pieces as the figure shows. The stem is made of black cord, which gets tightly wrapped with open(?) black silk, and a thin piece of florist's wire is wrapped with it. The wire allows the stems to be bent.
 
The crocheted pieces are sewn firmly to the stems. The end of the stem is hidden under one of the small oval crocheted pieces, which also hides the end of the loop made of twisted silk cord. One of the two completed agrafe pieces has a "olive" or "Bikeschen" button on the outside tip of the loop.
 

Monday, December 3, 2012

Things To Finish 2012:

I will never get any of this done if I never get started......

I have been really slow getting my list in order. I seem to have the bad habit of almost finishing things. My list is mostly just finishing touches and making the items that I purchased fabric for. Go figure.

For Me:

Work Corset -  Done 8/1.
** Fashion Corset - made duct tape pattern 9/3. **
2 Petticoats - Done 5/15
Cotton Dress - started 6/3, finished 6/6. Done.
Collar and Cuffs for Cotton Dress - Done 6/7


Cotton Sheer Dress - 5/21 bodice is done. 5/31 underskirt is done, adding flounces. Over skirt is done. Hate the bodice, need to remake it. Done 8/7.
Collar and Sleeves for Sheer - The sleeves will be tube sleeves with 2 or 3 ruffles at the bottom. Done 8/10.


** Wool Dress - 7/12 decided on a style. 7/25 decided on trim, burgundy wool. **
** Undersleeves & Collar - for wool dress **
Brown Mantle (need silk lining) - purchased lining but will be using it for my bonnet instead. get more silk. Will use this wool as a shawl. Done 8/4.
Bonnet - 4/12 purchased gold/tan silk. Started 7/6. Finished covering 7/16. Added English netting 8/13, need to make paper roses - red, pink, white. Done


** Bonnet - Added sheer, drawn bonnet to match my sheer dress 6/2. Made base 8/5. To finish in the spring 2013 **
Other Accessories:
        White Silk Belts
        White Silk Neck Ribbon - done
        Jewelry - Have amber eyeball agate ear drops 4/20. Have green tree agate and jade bracelet 5/19.
        ** Dress Cap - Decided on a dotted Swiss cap from Peterson's 1860. Get dotted Swiss from Needle and Thread $12/yard **

For Older Daughter:
Night Dress - Daughter to make this herself. crossed off list.
** Hat - Started on 3/1. 3/9 Finished the buckram hat, just need to add batting and silk. 4/12 purchased blue silk. **
Blue Dress - Finish box pleats around the bottom of the dress. 3/3 two of the six bias strips are hemmed. Remade the sleeves, moved the box pleating and made a belt 7/28. Added the box pleating across the top of the body. Done, she doesn't want the box pleating around the bottom.
Hood - to match her mantle


Under sleeves - 5/23 stitched plackets and gathered sleeves. Not needed. Remade the sleeves.
** Bosom friend -  To be made for fall of 2013**
** Paletote - from the blue wool. To be finished for Easter 2013 **
** New Skirt and semi-sheer body with blue silk bretelles - added 6/? with purchase of wool/silk fabric. To be finished for Easter 2013 **

For Younger Daughter:
Wrapper - need to quilt back and sew seams.
"Sprinkles dress" - trim with brown floss braid. Decided not to add the trim
** Poplin dress - to be finished for Easter 2013 **
** Sleeves & Collar - for the poplin dress. to be finished for Easter 2013 **
Mantle -  trim with boa. 3/9 Finished adding the boa. Done
Hood  - done


Brown ribbon bretelles - Marked off the list without completing.
** Paletote - from lavender wool. to be finished for Easter 2013 **
** Cage - She will need a cage to go under her poplin dress. to be finished for Easter 2013 **
Petticoats - done
Pill Box Hat - to match her mantle. finished 11/13


For Older Son:
Cap - Crochet wool cap. done 11/18
** Belt - for his coat. Will finish by fall 2013 **
Summer Tunic - Added this on 5/23. Am scrapping my black and tan dress fabric to make the boys matching tunics. Done 9/5.


For Younger Son:
Shoes - Purchased 8/10
Yellow pique jacket and skirt - Marked off the list without completing.
Sheer dress - Marked off the list without completing.
Summer Tunic - Added this on 5/23. Am scrapping my black and tan dress fabric to make the boys matching tunics. Started on 8/28. Finished 8/30.


Cap - decided on a crochet wool and silk cap 8/12. have fingering wool. Done
Coat - added 9/9. done 9/20


** Long sleeved tunic - of blue shirting, lined, to math his brother's. added 9/20. Will make for Fall 2013 **

Today starts the first full week of December and I will call an official close to this list. With the exception of my younger daughter's wrapper, that will be finished and given as a Christmas present. We have attended our final event for the year and will now concentrate on Christmas gifts, leaving no time in the year 2012 to finish any other items above. All items marked with ** will begin the list for 2013..... and start the sewing frenzy all over again.

I sincerely hope that you got majority of your 2012 sewing list completed and can sit back and admire your accomplishments. Please do share your lists with me. I would love to see your work.

With all sincerity,
Jessica Dean

Monday, November 26, 2012

Millinery Flowers

11/26/2012 - I have been such a procrastinator lately with making paper millinery flowers for my bonnet. Now, I find myself at the mercy of on-line suppliers. Hopefully all my paper roses, velvet leaves and silk lace gets here in time. I want to have my bonnet finished for this Friday.... I know, horrible! (hanging my head in shame)

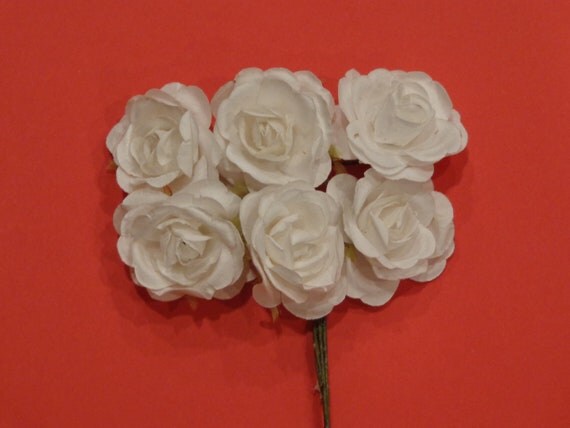
I found some lovely, paper, millinery flowers over at Etsy so of course I had to join the site and pick up some. My first purchase arrived today and I am thrilled... white roses from Shar Bear Crafts:


Here is a link to their Etsy shop: http://www.etsy.com/shop/SharBearCrafts

Here is the product link of anyone else wants to pick up some: http://www.etsy.com/listing/105434013/large-white-paper-flowers-6-pieces-4cm

I really should have picked up a few more. I know that I will think of a million things to use these for and I only purchased one bunch. :(

~ ~ ~ ~ ~ ~

12/1/2012 Update - My velvet leaves and more paper flowers came in the mail on Friday. I am so lucky. I tacked them on with pins in about 15 minutes and was ready to walk out the door with my finished bonnet on my head. The pics are posted here: http://jessicadeandesign.blogspot.com/2012/12/gold-silk-bonnet.html

As for the velvet leaves, I highly recommend them:


The product link is here: https://www.etsy.com/transaction/104024243
The Etsy seller's page is here: http://www.etsy.com/shop/MaryNotMartha

The other flowers that I received are nice but I can't really recommend them because of all of the glue drips and things. They showed in the image, so there are no hard feelings toward the seller. Since there were 3 dozen in an order, I just picked out the best ones to use.

Here is an image of the flowers:


Unfortunately, or perhaps fortunately, I didn't get my silk lace in time to add it to my bonnet. Instead, I used some navy silk organza that I picked up from that $5 sale a few months ago. I'm really happy with the way it turned out. :) Do jump over and see the pictures in this post: http://jessicadeandesign.blogspot.com/2012/12/gold-silk-bonnet.html

I'd love to hear who you get your millinery flowers from. Feel free to comment with your suggestions. :D

Monday, November 12, 2012

Girl's Wool Mantle & Hat

I made the full circle mantle last year and wanted to have the hat finished by this Saturday's parade. So, here we have it, all finished except for the white ostrich feather for the hat. (I'm picking that up in the morning)

 
There is no pattern for the hat. It's just my best guess, pillbox style hat, covered with batting and red wool to match the mantle. The inside is lined with quilted silk (harvested from an old silk shirt). I had wanted to add the boa trim to the bottom of the hat but my daughter didn't like how it tickled her forehead. Also, I couldn't find any references to hats with swan's down trim. They all had fur trim or a feather plume.
 
Here is an image from Le Follet 1863 that shows a fur trimmed hat:
 

Here is another hat from the same magazine. This one shows the back of a hat with a plume:


I also made a muff from the red wool and trimmed it with swan's down (feather boa). This was not common in the 1860s, so it is for modern use.
 
The mantle still isn't lined with silk. That silk sale just has not come around yet.

Here is the earlier post about this mantle: http://jessicadeandesign.blogspot.com/2012/03/finished-red-wool-mantle.html

Here is the pattern for the mantle: http://jessicadeandesign.blogspot.com/2011/09/boys-mantle.html

Monday, September 17, 2012

Tan Dress with Burgundy Trim

Original Post - 9/17/2012
I picked up some tan wool last year and some burgundy silk and burgundy wool earlier this year. Now I am going to make a dress for myself. Originally, I wanted to make this dress:


But now I am looking for other options because I want to use the burgundy as a ruched trim. Here is one option that I found in La Mode Illustree May 1862:

The trim looks very straight forward and I love the collar and neck ribbon. My only questions are about the buttons, they look like they go all the way down the front of the dress; and the pocket. This is most likely a house dress.

I think I want to use the burgundy wool as trim and the burgundy silk as accessories, IE. silk belt, shawl, ribbons, etc.

10/16/2012 Update
I had enough tan wool to make both a simple coat sleeve dress and a fringed shawl. So now I have all of the burgundy silk and wool left for trimming and accessories. Honestly I can't imagine using the entire length of silk for accessories, nor the entire length of wool for trimming.

Since the dress is going to have a modified coat sleeve, there is room for a nice puffy sleeve under and a pagoda sleeve jacket over top. I am seriously considering making a jacket from the burgundy wool and trimming it with some gold silk left over from making my bonnet.

Here are some more ideas for the dress trim:


All three images are from La Mode Illustree Feb 1862

The first image is the most like the original inspiration at the top of this post. The second is nice but we are using that style for my daughters dress, so I will probably not be using it for my dress. The last image has two dresses and I like the bodice trim on the purple dress and the belt ribbon and sleeve jockey on the other.

Here is a jacket sleeve idea:


And here are other jacket ideas:


11/25/2012 Jacket Update 
The burgundy wool as a jacket will not work. I made a muslin and 1 yard just isn't enough. So the jacket was made from some navy, tropical weight wool that I had. Here is the post for the jacket: http://jessicadeandesign.blogspot.com/2012/12/navy-wool-jacket.html. I added navy silk organza ties to my gold silk bonnet so the jacket, when done will still coordinate well with this dress. :D

6/8/2013 Dress Update 
This dress will be made this summer for fall use. I am strongly leaning toward a dress with braces (or ribbon bretelles). Here is a wool dress with black velvet belt and buttons, open coat sleeves and self fabric braces that tuck under the belt and hang over the skirt. The hem and edges are decorated with black taffeta and velvet ribbons.


I'll have to look around some more to see what other decorative options there are for wool dresses with braces. I'd still like to be able to use the burgundy wool and silk somehow.

Update 6/11/2013  
Here is a dress image that I found in Peterson's Magazine 1862.


The dress is trimmed with self fabric ruffles and braid.

Final Update ~ 3/10/2014
Well, this dress just wasn't meant to be. I was all ready to finish the bodice and can't find the fabric anywhere. I have a skirt and a shawl from this beautiful tropical weight wool and was sure that I also had enough for the bodice. However, it seems to be hiding from me, and doing a very good job of it.